


Tony J
-
Inlägg
71 -
Blev forummedlem
-
Senaste besök
-
Days Won
2
Inlägg postat av Tony J
-
-
5 timmar sedan, Corvette said:
Hmmm å så köper man en ferrari som han anser att man kan spackla upp, hur glad blir man åt det.
Eller så köper man en bil där airbagen löst ut på och så är den fullagad med motstånd osv.
Bilar som varit vattendränkta är ju en tickande bomb och tyvärr väldigt vanligt.Vi ser detta om och om igen hela tiden hur ägare tror de köpte sin drömbil och sedan får de reda på det är fuskat med de å de... osv
Man väljer ju de som inte har stora skador, det finns historik och bilder. Det han menar är att en salvage behöver inte vara ett utdömmande av bilen. Ferrarin t.ex. Var ju inte farligt med bakskärmen. Och att clean titel inte alltid är clean....
-
Här har ni en länk som beskriver Salvage, Totaled, clean titels. Det är sådan hysteri om att inte köpa Salvage title bilar.
Ni kommer bli överaskade kolla denna youtube clipp
-
On 2022-07-06 at 22:58, Brembo said:
Hej
Min GT 2012 har bakaxeln lite offcenter, syns mer efter sänkning.
Breda 10.5”x20” med 275or gör inte saken bättre

Någon som har ett liggandes eller vet vart mannan köpa i Sverige?
https://www.velocity-group.de/en/ eller https://badmanners.se/
-
Hej
Vad mer behöver man byta om man sätter in en Whipple kompressor på min 2007 GT Aut? 8600mil
Håller lådan, soppa-pumpen, spridare?
Är det någon som har en liggandes?
-
2 timmar sedan, Corvette said:
Skulle ta ner kåpan och kika in, innan jag häller i ny olja.
Ljudet du beskriver låter mycket udda, samt att det inte där hela tiden.Wiii pinjong lager
Woo hjullager
Inga dubbla svarta sträck vid burn, diffen
Ja det låter som om något inte kuggar i ordentligt....? Och det påverkas bara av fart, inte gaspådrag/belastning.
Blir ut och lägga några sträck då....
-
1 hour ago, Corvette said:
Symptom Chart — Driveline
Symptom Chart — Driveline Condition Possible Sources Action
- Traction-Lok does not work in snow, mud or on ice
- Differential
- CARRY OUT the Traction-Lok Differential Operation Check in this section. REPAIR as necessary. REFER to Section 205-02B.
- Lubricant leaking from the pinion seal, axle shaft oil seals or support arm to the housing
- Vent
- Damage in the seal contact area or dust slinger on the pinion flange dust shield
- CLEAN the axle housing vent.
- INSTALL a new pinion flange and the pinion seal if damage is found.
- Differential side gears/pinion gears are scored
- Insufficient lubrication
- INSTALL new gears. REFER to Section 205-02A or Section 205-02B. FILL the axle to specification.
- Incorrect or contaminated lubricant type
- INSTALL new gears. REFER to Section 205-02A or Section 205-02B. CLEAN and REFILL the axle to specification.
- Axle overheating
- Lubricant level too low
- CHECK the lubricant level. FILL the axle to specification.
- Incorrect or contaminated lubrication type
- INSPECT the axle for damage. REPAIR as necessary. CLEAN and REFILL the axle to specification.
- Bearing preload adjusted too tight
- CHECK the ring and pinion for damage. INSPECT the ring and pinion wear pattern. ADJUST the preload as necessary.
- Excessive gear wear
- INSPECT all the axle gears for wear or damage. INSTALL new components as necessary.
- Incorrect ring gear backlash
- INSPECT the ring gear for scoring. INSPECT the ring and pinion wear pattern. ADJUST the ring gear backlash as necessary.
- Broken gear teeth on the ring gear or pinion
- Overloading the vehicle
- INSTALL a new ring and pinion. REFER to Section 205-02A or Section 205-02B.
- Gray or milky axle lubricant in low mileage vehicles
- Marking compound in axle fluid
- Inspect axle housing and vent for damage or leaks. Refer to Axle Fluid Analysis in this section.
Symptom Chart — NVH
Symptom Chart — NVH Condition Possible Sources Action NOTE: NVH symptoms should be identified using the diagnostic tools that are available. For a list of these tools, an explanation of their uses and a glossary of common terms, refer to Section 100-04. Since it is possible any one of multiple systems may be the cause of a symptom, it may be necessary to use a process of elimination type of diagnostic approach to pinpoint the responsible system. If this is not the causal system for the symptom, refer back to Section 100-04 for the next likely system and continue diagnosis.
- Axle howling or whine
- Axle lubricant low
- CHECK the lubricant level. FILL the axle to specification. REFER to Section 205-02A or Section 205-02B.
- Tuned dampers missing or incorrectly installed
- REFER to the TSB and follow the procedure outlined.
- Axle housing damage
- INSPECT the axle housing for damage. REPAIR or INSTALL a new axle as necessary. REFER to Section 205-02A or Section 205-02B.
- Damaged or worn wheel hub bearings
- CHECK for abnormal rear wheel bearing play or roughness. INSTALL a new wheel bearing as necessary. REFER to Section 205-02A or Section 205-02B.
- Damaged or worn differential ring and pinion
- INSPECT and INSTALL a new differential ring and pinion as necessary. REFER to Section 205-02A or Section 205-02B.
- Damaged or worn differential side or pinion bearings
- INSPECT and INSTALL new differential side or pinion bearings as necessary. REFER to Section 205-02A or Section 205-02B.
- Driveline clunk — loud clunk when shifting from REVERSE to DRIVE
- Incorrect axle lubricant level
- CHECK the lubricant level. FILL the axle to specification. REFER to Section 205-02A or Section 205-02B.
- Excessive backlash in the axle
- CHECK the ring gear backlash. REPAIR as necessary. REFER to Section 205-02A or Section 205-02B.
- Damaged or worn pinion bearings
- REPAIR or INSTALL new pinion bearings as necessary. REFER to Section 205-02A or Section 205-02B.
- Damaged or worn U-joints
- INSPECT the U-joints for wear or damage. INSTALL new U-joints or driveshaft as necessary. REFER to Section 205-01.
- Driveline clunk — occurs as the vehicle starts to move forward following a stop
- Worn driveshaft CV joint or U-joints
- INSPECT the CV joint and U-joints for wear. INSTALL a new driveshaft or U-joints as necessary. REFER to Section 205-01.
- Loose axle mount
- CHECK the axle for loose bolts. TIGHTEN to specification. REFER to Section 205-02A or Section 205-02B.
- High pitched chattering — noise from the axle when the vehicle is turning
- Incorrect or contaminated lubricant
- CHECK the vehicle by driving in tight circles (5 clockwise, 5 counterclockwise). FLUSH and REFILL with the specified rear axle lubricant and friction modifier as necessary.
- Damaged or worn differential (differential side gears and pinion gears)
- REPAIR or INSTALL new differential side gears or pinion gears as necessary. REFER to Section 205-02A or Section 205-02B.
- Rumble or boom — noise occurs at coast/deceleration, usually driveshaft speed-related and noticeable over a wide range of speeds
- Excessive driveshaft runout and/or driveshaft is out-of-balance
- CHECK the driveshaft runout and balance. REFER to Driveshaft Runout and Balancing in this section.
- Binding or seized U-joints
- ROTATE the driveshaft and CHECK for binding or seized U-joints. INSTALL new U-joints or driveshaft as necessary. REFER to Section 205-01.
- Grunting — normally associated with a shudder experienced during acceleration from a complete stop
- Binding driveshaft CV joint
- INSPECT the driveshaft CV joint for binding. INSTALL a new driveshaft as necessary. REFER to Section 205-01.
- Loose axle mount bolts or suspension fasteners
- INSPECT the rear suspension and axle. TIGHTEN the fasteners to specification. REFER to Section 205-02A or Section 205-02B.
- Howl — can occur at various speeds and driving conditions. Affected by acceleration and deceleration
- Incorrect ring and pinion contact, incorrect bearing preload or gear damage
- INSPECT and REPAIR as necessary. REFER to Section 205-02A or Section 205-02B.
- Chuckle — heard at coast/deceleration. Also described as a knock
- Incorrect ring and pinion contact or damaged teeth on the coast side of the ring and pinion
- INSPECT and REPAIR as necessary. REFER to Section 205-02A or Section 205-02B.
- Knock — noise occurs at various speeds. Not affected by acceleration or deceleration
- Gear tooth damage to the drive side of the ring and pinion
- INSTALL a new ring and pinion. REFER to Section 205-02A or Section 205-02B.
- Scraping noise — a continuous low pitched noise starting at low speeds
- Worn or damaged pinion bearings
- INSPECT and REPAIR or INSTALL new pinion bearings. REFER to Section 205-02A or Section 205-02B.
- Driveline shudder — occurs during acceleration from a slow speed or stop
- Incorrect transmission crossmember orientation
- CHECK for correct orientation. REINSTALL if necessary. REFER to Section 502-00.
- Center bearing spacer missing or incorrectly installed
- CHECK for correct installation of center bearing spacer. REFER to Section 205-01.
- Drive axle assembly mispositioned
- CHECK the axle mounts and the rear suspension for damage or wear. REPAIR as necessary. REFER to Section 205-02A or Section 205-02B.
- Loose axle bolts
- CHECK the axle for loose bolts. TIGHTEN the bolts to specification. REFER to Section 205-02A or Section 205-02B.
- Driveline angles out of specification
- CHECK for correct driveline angles. REFER to Driveline Angle Measurement in this section. For vehicles equipped with a 2 piece driveshaft, ADJUST the driveline angle as neccesary. REFER to Driveline Angle Adjustment In this section.
- U-joints binding or seized
- ROTATE the driveshaft and CHECK for binding or seized U-joints. INSTALL new U-joints or driveshaft as necessary. REFER to Section 205-01.
- Binding or damaged driveshaft CV joint
- INSPECT the driveshaft CV joint for binding or damage. INSTALL a new driveshaft as necessary. REPAIR as necessary. REFER to Section 205-01.
- Driveline vibration — occurs at cruising speeds
- Missing weights or damage to driveshaft
- INSPECT the driveshaft. INSTALL a new driveshaft as necessary. REFER to Section 205-01.
- Worn U-joints
- CHECK for wear or incorrect seating. INSTALL new U-joints or driveshaft as necessary. REFER to Section 205-01.
- Misalignment of yellow dot on driveshaft-to-yellow dot on pinion flange plus or minus 1 bolt hole
- REINSTALL driveshaft with yellow dots aligned plus or minus 1 bolt hole. REFER to Section 205-01.
- Worn or damaged driveshaft center bearing support
- CHECK the insulator for damage or wear. ROTATE the driveshaft and CHECK for rough operation. INSTALL a new driveshaft as necessary. REFER to Section 205-01.
- Loose axle pinion flange bolts
- INSPECT the axle pinion flange. TIGHTEN the pinion flange bolts to specification. REFER to Section 205-01.
- Excessive axle pinion flange runout
- CHECK the pinion flange runout. REPAIR as necessary. REFER to Pinion Flange Runout Check in this section.
- Excessive transmission flange runout
- CHECK the transmission flange runout. REPAIR as necessary. REFER to Specification in this section.
- Binding or damaged driveshaft CV joint
- INSPECT the driveshaft CV joint for binding or damage. INSTALL a new driveshaft as necessary. REFER to Section 205-01.
- Excessive driveshaft runout and/or driveshaft out-of-balance
- CHECK the driveshaft runout and balance. REFER to Driveshaft Runout and Balancing in this section.
- Driveline angles out of specification
- CHECK for correct driveline angles. REPAIR as necessary. REFER to Driveline Angle Measurement in this section.
- Transmission mount not centered
- NEUTRALIZE the transmission mount. REFER to the Transmission Crossmember procedure in Section 502-00.
Axle Fluid Analysis
The appearance of milky or gray axle fluid in early mileage axles is a result of white marking compound used at the assembly plant to verify gear mesh contact pattern. The marking compound within the fluid will darken some over time. The milky fluid appearance will diminish and cause no harm and does not require a fluid change.
Analysis of Leakage
Clean up the leaking area enough to identify the exact source.
A plugged axle housing vent can cause excessive pinion seal lip wear due to internal pressure buildup.
Verify the lubricant level is at specification.
Axle Vent
A plugged vent will cause excessive seal lip wear due to internal pressure buildup. If a leak occurs, check the vent. If the vent cannot be cleared, install a new vent.
Drive Pinion Seal
Leaks at the drive pinion seal originate from the following causes:
- Damaged seal
- Worn seal journal surface
Any damage to the seal bore (dings, dents, gouges or other imperfections) distorts the seal casing and allows leakage past the outer edge of the drive pinion seal.
The drive pinion seal can be torn, cut or gouged if it is not installed correctly. The spring that holds the drive pinion seal against the pinion flange may be knocked out and allow fluid to pass the lip.
Metal chips trapped at the sealing lip can cause oil leaks. These can cause a wear groove on the drive pinion flange and result in pinion seal wear.
When a seal leak occurs, install a new drive pinion seal and check the vent to make sure it is clean and free of foreign material.
A new drive pinion flange must be installed if any of these conditions exist.
Drive Pinion Nut
NOTICE: Install the drive pinion nut to the correct torque specifications or damage to the differential components may occur.
On some high-mileage vehicles, oil may leak through the threads of the drive pinion nut. This condition can be corrected by installing a new nut and applying threadlock on the threads and nut face.
Differential Seals
NOTICE: When installing shafts, do not allow splines to contact seals during installation or damage to the seals may occur.
Axle shaft housing seals are susceptible to the same types of damage as drive pinion seals if incorrectly installed. The seal bore must be clean and the lip handled carefully to avoid cutting or tearing it. The seal journal surface must be free of nicks, gouges and rough surface texture.
For information on differential seals, refer to Section 205-02A or Section 205-02B.
Component Tests
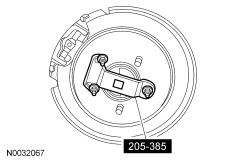
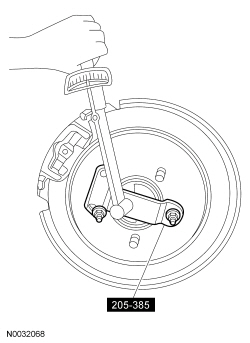
Traction-Lok Differential Operation Check
A Traction-Lok differential can be checked for correct operation without removing it from the rear axle housing.
Raise and remove only one rear wheel. Install the Differential Gauge on the wheel bolts.
Use a torque wrench with the capacity of at least 271 Nm (200 lb-ft) to rotate the axle shaft. Make sure that the transmission is in NEUTRAL, and that one rear wheel is on the floor while the other rear wheel is raised off the floor. The breakaway torque required to start rotation must be at least 27 Nm (20 lb-ft). The initial breakaway torque may be higher than the continuous turning torque.
The axle shaft must turn with even pressure throughout the check without slipping or binding. If the torque reading is less than specified, check the differential case for incorrect assembly.
Traction-Lok Differential Check Road Test
- Place one wheel on a dry surface and the other wheel on ice, mud or snow.
- Gradually open the throttle to obtain maximum traction prior to break away. The ability to move the vehicle demonstrates correct performance of a Traction-Lok rear axle assembly.
- When starting with one wheel on an excessively slippery surface, a slight application of the parking brake may be necessary to help energize the Traction-Lok feature of the differential. Release the brake when traction is established. Use light throttle on starting to provide maximum traction.
- If, with unequal traction, both wheels slip, the limited slip rear axle has done all it can possibly do.
- In extreme cases of differences in traction, the wheel with the least traction may spin after the Traction-Lok has transferred as much torque as possible to the non-slipping wheel.
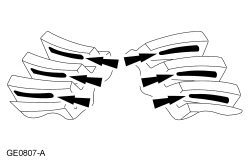
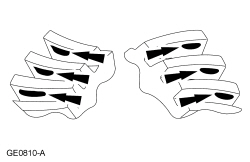
Tooth Contact Pattern Check — Gearset
- To check the gear tooth contact, paint the gear teeth with the special marking compound. A mixture that is too wet will run and smear; a mixture that is too dry cannot be pressed out from between the teeth.
- Use a box wrench on the ring gear bolts as a lever to rotate the ring gear several complete revolutions in both directions or until a clear tooth contact pattern is obtained.
- Certain types of gear tooth contact patterns on the ring gear indicate incorrect adjustment. Incorrect adjustment can be corrected by readjusting the ring gear or the pinion.
Contact Pattern Location
In general, desirable ring gear tooth patterns must have the following characteristics:
- Drive pattern on the drive side ring gear well centered on the tooth.
- Coast pattern on the coast side ring gear well centered on the tooth.
- Clearance between the pattern and the top of the tooth.
- No hard lines where the pressure is high.
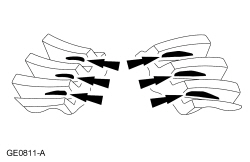
Acceptable Ring Gear Tooth Patterns For All Axles
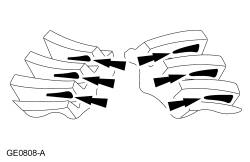
Correct Backlash With a Thinner Pinion Position Shim Required
Correct Backlash With a Thicker Pinion Position Shim
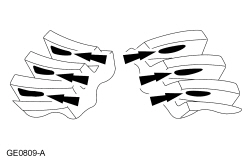
Correct the Pinion Position Shim That Requires a Decrease in Backlash
Correct Pinion Position Shim That Requires an Increase in Backlash
Tack.....pust


-
Haloj
Har ett missljud från bakaxeln tror jag, kommer vid 40-70kmh sedan tyst. Låter som ett rasselljud...drrrrrrr. Kärran har rullat 8500mil, ska byta olja få se om det hjälper, men kan det vara ett lager eller differential??
-
19 timmar sedan, Richy said:
Märkligt, har varit på två olika besiktningsfirmor de gånger jag gjort det, och ingen anmärkning.
Har förstått att när bilen togs in som flyttgods så var den ett företag i Gbg som monterade dessa, hänger det ihop med att min är flyttgods kanske?
Japp flyttgods kan se ut lite som helst.....
-
On 2021-10-13 at 03:51, Screaming Yellow S-län said:
Ingen som vet nån sida i Europa dom
säljer dessa?
mvhKolla upp dessa
https://www.badmanners.se/ https://www.velocity-group.de/ https://nemesisuk.com/
-
On 2022-03-06 at 18:17, Bastlund said:
Japp okej! Jag tänkte såklart kolla med en Carfax förstås oavsett. Skulle det synas om det bara är en plåtskada eller nåt allvarligare? Har inte gjort det ännu så jag har ingen koll på carfax ännu..

Har du tur kan du hitta bilder på skadan, men det går ju även även att kolla med verkstaden som repade bilen vilka skador det var. Lycka till
-
19 timmar sedan, Per Berglund said:
Inte för kanske du är det men ofta talesättet "den snåle köper dyrt" passar in här!

Alla varningsklockor ringer!
Man skrotar en bil för man beräknar att det är dels för svårt att laga men även för alla framtida dolfa fel som kan dyka upp.
Så är det med moderna bilar med en massa elektronik.
Vanligt att bilarna blivit tagit in vatten av någon orsak och det ger en jäkla massa följdbelymmer då korrosion får i smyg jobba på.
Kan dyka upp flera år senare och vara extremt dyrt att fixaNästa bekymmer får du om du vill sälja bilen....ALLA undviker en bil som har en rapport!
Du blir tvungen sälja den för ett betydligt lägre värde då de flesta undviker alla dessa bilar som varit med om något.I Sverige är det dessutom väldigt viktigt ha en felfri bil eftersom det är så få verkstäder som har kunskap om dessa.
Kan bli väldigt dyrt för dig om bilen börjar larma om ett fel som är svårt att diagnostisera.Köp en ärlig och frisk bil även om den skulle vara 100.000kr dyrare
Har du inte råd? Okej då får du vänta ett tag till alternativt chansa på en sådan där "trisslott" som kan skapa ännu mera kostnader
Hej
Lägger mig i lite här. Köpte en 07a GT som hade en salvage titel 2015, den hade kört in höger sida i ett Safe guard och sidan var repad och bucklig, byte av framskärm, huv, sparklåda, dörr och bakskärm, fälgar, importerad till Sverige och lagad här 2016 6400mil. Inga som helst problem med den, nu rullat 8500 mil, hel nöjd med bilen. Det beror ju på vad bilen varit med om som avgör, i USA skrotar de bilar på löpande band fast skadorna inte alltid är så allvarliga de tittar mycket på ålder på bilen, utbudet och priserna är ju rätt låga där, så det lönar sig inte att repa dem, behöver inte vara så stora skador för att de skall få en salvage titel. Har en bekant i LA som jobbar som bilplåtslagare på en volvo verkstad det kan räcka med en mkt liten skada om bilen är uppåt 10år....
-
 1
1
-
-
Har lite prylar kolla in, även billig frakt.
-
Blir ett oljebyte, du har nog rätt om milen.....nu kollade jag idag, ingen oljefläck?? Skumt
-
Tjena
Kärran är sänkt ca. 3,5cm, panhardstag, 8500mil
Har fått ett vinande ljud mellan 80 och 100kmh vid gas, tystnar när jag släpper gasen eller kör över 100kmh.
Har även ett klunkande ljud vid kraftig skakning i sidled av bilen.
Och idag hade jag en liten oljepöl som en snusdosa under bakaxeln....
-
16 timmar sedan, Tony J said:
Halloj
4,6l 2005a 8000mil
Satte in BBK CAI med oljefilter, de påstår att det inte behövs tune med den? Men efter ca. 2mils körning tändes motorlampan.....tog bort minus polen/nollade,
startade på nytt, ingen lampa tändes, lät bilen stå på tomgång 15min, körde lugnt i ca 2mil, gasade sedan på rejält full trottel
Gick som en dröm och skönt insugs ljud
efter ett tag tändes lampan igen??? Vad göra?
Så ja, efter ommontering verkar det som om det funkar kört 5 mil utan problem nu
-
1
-
-
Exakt ett sådant...har inget att läsa koder med. Men den knackar inte och baktänder inte? Knack brukar väl vara lean och baktändning rich....
Nu har jag monterat om det....ut och köra lite igen, efter tomgång i 10-15min.....
-
Halloj
4,6l 2005a 8000mil
Satte in BBK CAI med oljefilter, de påstår att det inte behövs tune med den? Men efter ca. 2mils körning tändes motorlampan.....tog bort minus polen/nollade,
startade på nytt, ingen lampa tändes, lät bilen stå på tomgång 15min, körde lugnt i ca 2mil, gasade sedan på rejält full trottel
Gick som en dröm och skönt insugs ljud
efter ett tag tändes lampan igen??? Vad göra?
-
On 2021-04-17 at 08:06, Lars Alfredsson said:
Välkommen igen!
Tack
-
Okey då blir det nog dom...tack
-
1 minut sedan, mike85 said:
Det är säkert beroende på ställe och besiktningsmannen men jag har alltid kommit igenom med dom.
Är du nöjd med soundet......är det högt i coupen?
-
Hej,
Tänkte byta till dessa SLP Loadmouth. Någon som vet om dessa går igenom besiktningen.
-
8 minuter sedan, Richy said: Välkommen tillbaka!
Tack å Tack
-
Halloj
Ny gammal medlem, saknade min Mustang GT 02 som såldes för 3 år sedan. Gick ur klubben men är nu tillbaka, äger nu en 2007 GT 4.6a.
-
Hej,
Är ny medlem sedan oktober, äger en Musse GT 4,6l V8 lite lätt trimmad 300+hp
Ska bli kul att få åka ut i sommar titta på lite andra Mussar och träffas.
Ha de gött alla!!
//Tony
-
1
-


Kompressor
in Mustang 2005-2014
Hej
Vill du sälja den?
Vad ska du ha för kompressorn? Vilket märke?
Mvh