
Corvette
Klubbmedlem
-
Blev forummedlem
-
Senaste besök
Allt skrivet av Corvette
-
 har monterat led som är svarta när de är släckta och röda när de lyser, tejpar dem vid besiktningen
-
finns lösningar på allt om de verkligen vill in men man behöver inte bjuda in dem som det är nu
-
från Juli i år om jag förstått det rätt får inte nycklarna längre vara aktiva utan måste somna in
-
Bra har beställt nu också 👍
-
Men det har SCT löst nu med myndigheterna
-
Varför skall det kröka sig??? Du kommer flytta bakaxeln åt vänster när du sänker den mycket, du hämtar hem detta med ett justerbart panhardstag 😎
-
vad söker du? regnr? du kan mejla mig på peter@grufmanbil.se så slipper vi hålla på här så ska jag försöka hjälpa dig
-
Detta är bra att veta om du har key less go på din mustang eller någon av dina övriga bilar. Detta har just kommit till Sverige!!!
-
typ en multimeter
-
kontakta Beck Ab så löser han det beckab.se
-
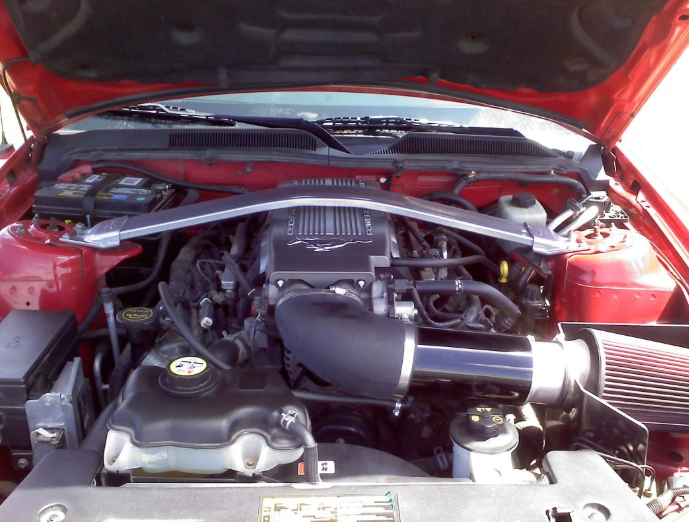
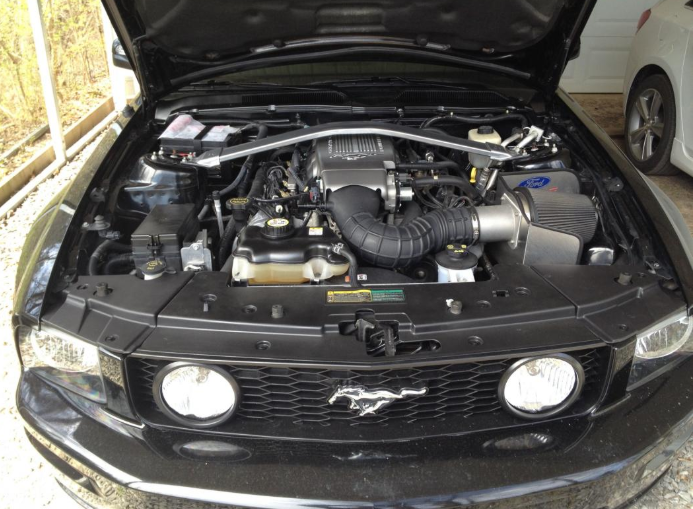
 Riktigt snygg, vad är det för front?
 -
du måste ju slänga på en push bar

-
Beror på hur du skall använda bilen Går inte komma ifrån att det är otroligt roligt iblnd att få röra runt i grutan med en manuell slev Men är otroligt tacksam för att jag bytt till automat när man står i kö eller kör cruising Man behöver helt enkelt en av varje 😎
-
De måste absolut kollas om det uppstår missljud, den andra listan om de skulle hitta partiklar vill du inte se... så den publicerar vi inte för då kommer ingen Musse ägare kunna sova sött sen Kan meddela att detta ljud kom när 5.0 kom, inget unikt för 2018+. Har bara blivit en masspsykos samt att icke ägare spunnit på ljudet trots att de aldrig ägt en Musse. Vi skall inte föringa att 2018+ har ett känt Piston Slap problem på vissa bilar som tyvärr kan medföra tråkigheter
-
de skall då analysera filtret efter metallspån om så är fallet att det finns spån där finns en jättelista vad de skall kolla
SSM 47787 - 2011-2019 Mustang/F-150 - 5.0L - Tick Tap And/or Typewriter Noise At Idle Some 2011-2019 Mustang and F-150 vehicles equipped with a 5.0L engine may exhibit a ticking noise at idle after an engine oil change. It is often referred to as typewriter noise because of its similarity to the sound of a mechanical typewriter. The noise in question may be heard on some engines when engine temperatures reach 150°F (65°C) or higher and engine speed is at idle up to approximately 1700 RPM's. It can typically be heard at the front wheel well, and is often isolated to the transmission bell housing or oil pan area. typewriter noise is not detrimental to engine function or durability and has no short or long term effectson the engine. This an operating characteristic of the 5.0L engine and no repairs should be attempted. APPLICABLE VEHICLES 2011 - 2014 TRUCK: F6 F150/LINCOLN MARK LT 2018 - 2019 TRUCK: FC P552N F-150 2015 - 2017 TRUCK: FC P552N F-150 2012 - 2013 CAR: ZF S197N MUSTANG 2011 - 2014 CAR: ZF S197N MUSTANG 2019 CAR: ZG S550N MUSTANG 2015 - 2019 CAR: ZG S550N MUSTANG
Kommer från Ford US
Nej, vissa skall bara tvättas i såpvatten
Nej det där är steeda och ska vara blått http://grufmanbil.se/produkt/8844/?in=364 eller så kan man byta filter så det blir fint igen http://grufmanbil.se/produkt/8839/
Köpte camberbultar istället för att slipa upp hålen 😎
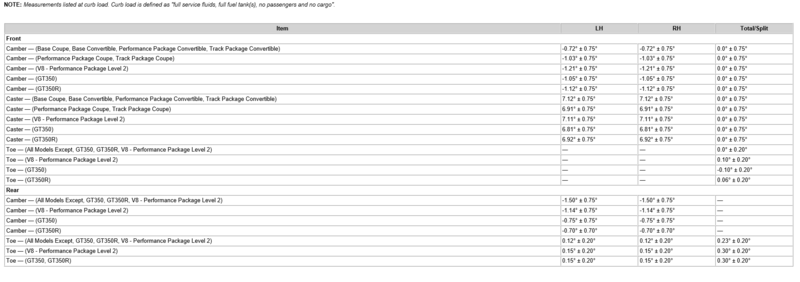
Special Tool(s) / General Equipment Wheel Alignment System Adjustment NOTICE: Suspension fasteners are critical parts that affect the performance of vital components and systems. Failure of these fasteners may result in major service expense. Use the same or equivalent parts if replacement is necessary. Do not use a replacement part of lesser quality or substitute design. Tighten fasteners as specified. Using alignment equipment and the manufacturer's instructions, measure the front camber. Use the General Equipment: Wheel Alignment System Remove the wheels and tires. Refer to: Wheel and Tire (204-04A Wheels and Tires, General Procedures). On both sides. Unclip and position aside the wheel speed sensor harness. On both sides. Remove and discard the strut-to-spindle bolts and nuts. NOTE: Support the wheel spindle using mechanic's wire. Note the orientation of the strut-to-spindle bolts and flag nuts, then remove and discard the bolts and flag nuts. Using a suitable grinding tool, enlarge the strut-to-wheel spindle upper mounting hole as indicated. Remove any burrs. Clean and paint any exposed metal. NOTE: Do not fully tighten the strut-to-spindle bolts and nuts until the alignment has been corrected. NOTE: Original equipment bolts are splined, service bolts are smooth and smaller in diameter. On both sides. Position the wheel spindle and install the 2 new service strut-to-spindle bolts and nuts and tighten until snug. On both sides. Position the wheel speed sensor harness. Install the wheels and tires. Refer to: Wheel and Tire (204-04A Wheels and Tires, General Procedures). Using alignment equipment and the manufacturer's instructions, measure the front camber. Use the General Equipment: Wheel Alignment System On both sides. Tighten the strut-to-spindle bolts and nuts. Torque: 184 lb.ft (250 Nm) Recheck alignment to verify camber change and adjust front toe if necessary. Refer to: Front Toe Adjustment (204-00 Suspension System - General Information, General Procedures). Special Tool(s) / General Equipment Wheel Alignment System Adjustment NOTE: Make sure that the vehicle is standing on a level surface. Steering wheel in straight ahead position. Using alignment equipment and the manufacturer's instructions, check the front toe setting on both sides. Use the General Equipment: Wheel Alignment System On both sides. Loosen the outer tie rod end jamb nut. Torque: 76 lb.ft (103 Nm) On both sides. Position aside the steering gear boot clamp. NOTE: Do not allow the steering gear bellows to twist when the inner tie rod is rotated. On both sides. Rotate the inner tie rods until the toe reading is within specifications. Recheck the toe settings and adjust as necessary. Special Tool(s) / General Equipment Wheel Alignment System Adjustment NOTICE: Suspension fasteners are critical parts that affect the performance of vital components and systems. Failure of these fasteners may result in major service expense. Use the same or equivalent parts if replacement is necessary. Do not use a replacement part of lesser quality or substitute design. Tighten fasteners as specified. Using alignment equipment and the manufacturer's instructions, measure the rear camber. Use the General Equipment: Wheel Alignment System Loosen the upper control arm inboard nut approximately 2 turns, and slide the upper control arm inboard or outboard to adjust the rear camber. Torque: 85 lb.ft (115 Nm) Recheck alignment to verify camber change and adjust rear toe if necessary. Refer to: Rear Toe Adjustment (204-00 Suspension System - General Information, General Procedures). Special Tool(s) / General Equipment Wheel Alignment System Adjustment Using a holding device, hold the steering wheel in the straight-ahead position. Using alignment equipment and the manufacturer's instructions, check the rear toe setting on both sides. Use the General Equipment: Wheel Alignment System NOTE: Make sure that the toe settings are not disturbed while tightening the nuts. Loosen the toe link nut approximately one full turn. Torque: 129 lb.ft (175 Nm) Rotate the toe link bolt to achieve the specified toe setting. Recheck the rear toe settings and adjust as necessary.
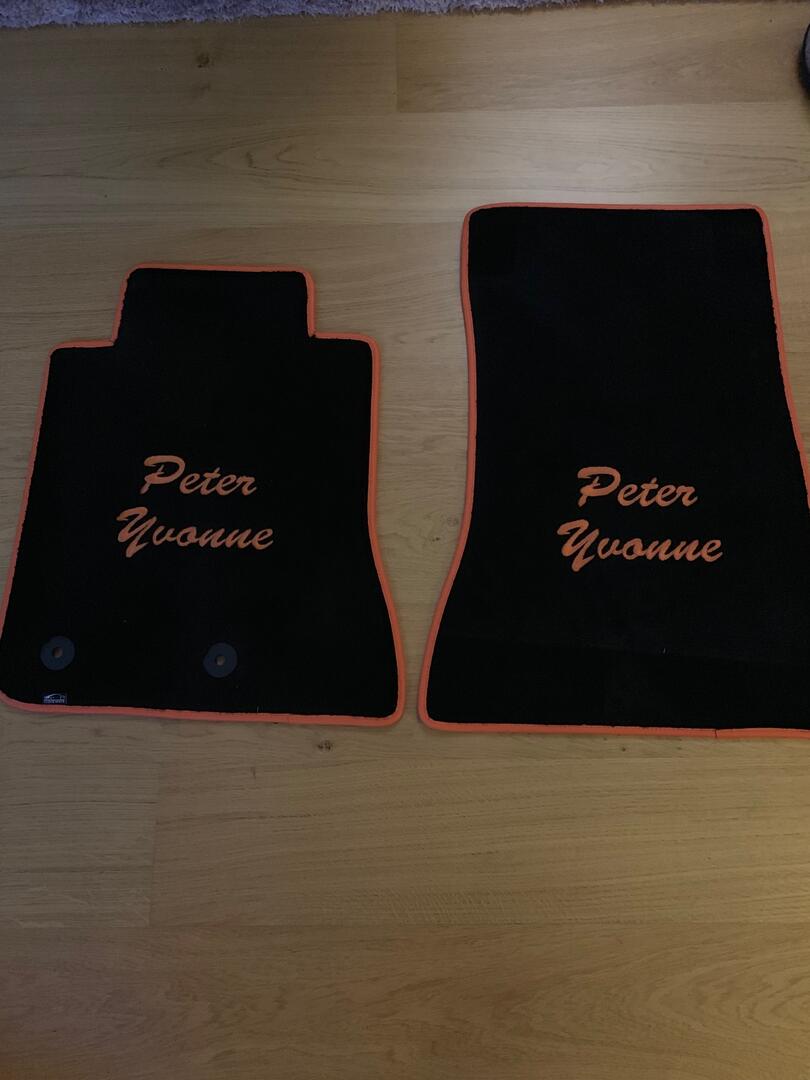
 går ju inte att brodera genom plasten som mattorna har jag rekommenderar dessa https://www.lloydmatsstore.com/
 Ford har dragit in svångremmen så någon snygg logga får inte användas på eftermarknadsmattor. Du får designa dina egna med namn osv på LLoyds i USA, fast inget som anknyter till Mussen dock